The Health Workforce Connector is an official government website for connecting skilled health professionals to health care sites in communities of need.
- Current and future clinicians use the Health Workforce Connector to search for job vacancies or training opportunities.
- Health care facilities that participate in certain HRSA programs use the Health Workforce Connector to post job vacancies and training opportunities and search for candidates to fill these positions.
The health care sites participate in at least one of these HRSA programs:
- National Health Service Corps (NHSC)
- Nurse Corps
- Pediatric Specialty Loan Repayment Program
- Substance Use Disorder and Treatment Loan Repayment Program (STAR LRP)
This page provides instructions for clinicians on using the Health Workforce Connector.
If you are a point of content (POC) for a health care site, refer to the Site Points of Contact User Guide (PDF - 5 MB) for instructions on accessing and using the Health Workforce Connector.
Searching for jobs and training
Using the home page
The Health Workforce Connector provides you with three ways to search for jobs and training from the home page:
- Use the Keyword and Location search at the top of the page to display jobs and training.
- Use the Search by Discipline links to display all jobs for a specific discipline.
- Use the Search by Program links to display all jobs for a specific program.
Using Advanced Search to search for jobs
If you have been accepted in to one of our programs, you may want to use Advanced Search to locate job opportunities that meet your program's requirements.
- On the Health Workforce Connector home page, select Go to Advanced Search.
- Under Location, enter the city, state, or ZIP code where you would like to work.
- Under HRSA Program, select your program.
- If you are a scholarship participant: Under HPSA Scores, specify the HPSA score range required by your program.
- For NHSC Scholarship participants, see Health Professional Shortage Area (HPSA) Score - Class Year.
- For Nurse Corps Scholarship participants, refer to the Nurse Corps Application and Program Guidance (PDF).
- Select Search.
Using Advanced Search to search for training
- On the Health Workforce Connector home page, select Go to Advanced Search.
- Under Location, enter the city, state, or ZIP code where you would like find training.
- Under Location Type, select, Training.
- Select Search.
Signing in and creating a profile
If you want health care sites to search for you and recruit you using the Health Workforce Connector, create and publish a profile that includes your experience, education, training and certifications, and employment preferences.
If you are a current NHSC, Nurse Corps, or STAR LRP participant or you have applied to any of these programs, you already have a BHW portal account.
Sign in to an existing BHW Portal Account and create a profile:
- On the Health Workforce Connector home page, select Sign In.
- On the pop-up window (bhwnextgen.hrsa.gov says), select OK.
- On the Sign In window, type your email and password. Then, select Sign In.
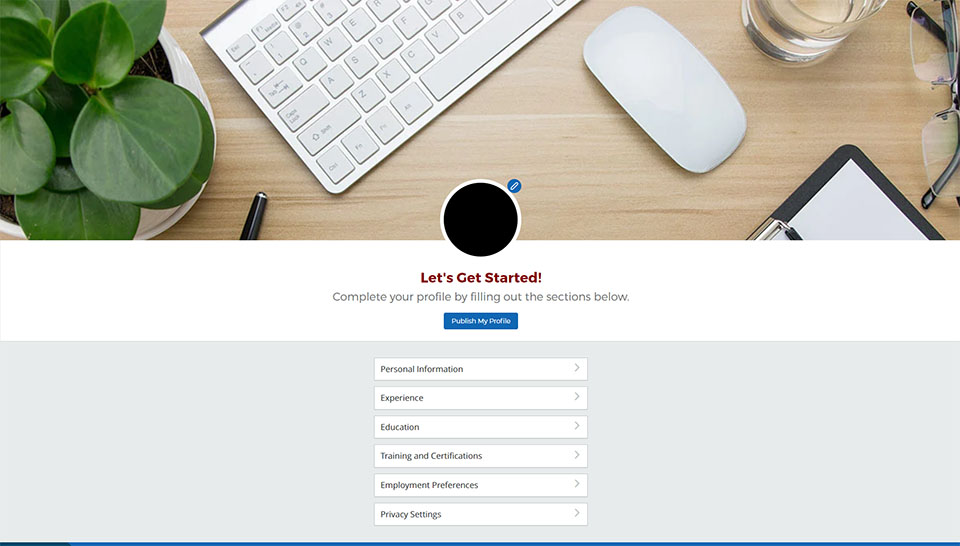
- On your profile page, select each section, complete the fields, and select Save and Continue at the bottom of the page.
- After you complete the sections of your profile, select Publish My Profile.
Create a BHW Portal Account and create a profile:
- On the Health Workforce Connector home page, select Create a Profile.
- In the Sign Up: Create Your Portal Account window, type your name, email, and password. Then, click Next.
- In the Sign Up window for your security question, select a question and type the answer. Then, click Sign Up.
- You will receive an email: Activate Your BHW Portal Account. (If you didn't receive this email, check your junk or spam folder.) Select the link in the email. On the Account Activated window, select Sign In.
- On the pop-up window (bhwnextgen.hrsa.gov says), select OK.
- On the Sign In window, type your email and password. Then, select Sign In.
- On the Health Workforce Connector home page, you will see your initials in the top right corner of the page. Select your initials and select Edit Profile.
- On the Let's Get Started page, select each section, complete the fields, and select Save and Continue at the bottom of the page.
- After you complete the sections of your profile, select Publish My Profile.
After you publish your profile, you can connect with health care sites as well as other users and share your profile information with them.
Connecting with sites, opportunities, and clinicians
Connect with a health care site
If you want to show a health care site that you're interested in them and their opportunities, you can use the Health Workforce Connector to connect with the site. The Health Workforce Connector will generate an email indicating your interest, with a link to your published profile, and send it to the site. The site POCs can contact you directly by email or phone.
Note: Before you connect with a health care site, you must publish your profile.
- On the Health Workforce Connector home page, select Sign In.
- On the pop-up window (bhwnextgen.hrsa.gov says), select OK.
- On the Sign In window, type your email and password. Then, select Sign In.
- Use the Search to search for a site.
- On the Search Results page, select the Sites tab and then select a site.
- On the page for the site, select the Connect with Site button.
Connect with an opportunity
If you want to show a health care site that you're interested in a specific opportunity at that site, you can use the Health Workforce Connector to connect with the opportunity. The site will receive an email indicating your interest, with a link to your published profile. The site POCs can contact you directly by email or phone.
- On the Health Workforce Connector home page, select Sign In.
- On the pop-up window (bhwnextgen.hrsa.gov says), select OK.
- On the Sign In window, type your email and password. Then, select Sign In.
- Use the Search to search for an opportunity.
- On the Search Results page, select the Opportunities tab and then select an opportunity.
- On the site page for that opportunity, the opportunity will appear under the Opportunity tab. (You may have to scroll down the page to see the opportunity.)
Connect with another clinician
If you want to find other participants with similar interests, you can use the Health Workforce Connector to connect with other clinicians. The clinician will receive an email indicating your interest in connecting, with a link to your published profile. They have the option to approve or deny the connection.
Note: Before you connect with another clinician, you must publish your profile.
- On the Health Workforce Connector home page, select Sign In.
- On the pop-up window (bhwnextgen.hrsa.gov says), select OK.
- On the Sign In window, type your email and password. Then, select Sign In.
- Select the Account menu in the top right corner of the screen and select Virtual Connections.
- On the My Virtual Connections Dashboard, select Search in the Contacts panel.
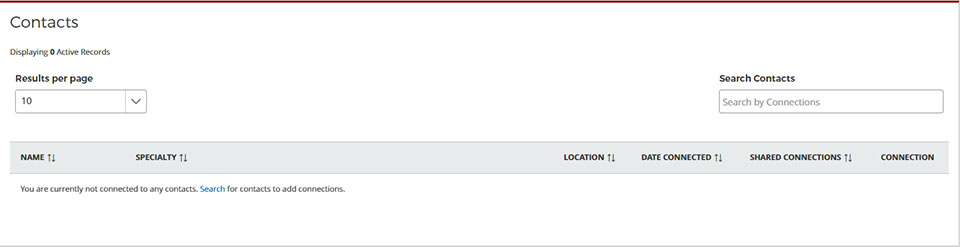
- Use the Search to search for contacts.
- On the Search Results page, select a contact.
- On the contact's profile page, select Connect.
Monitor alerts, contacts, and connections
- On the Health Workforce Connector home page, select Sign In.
- On the pop-up window (bhwnextgen.hrsa.gov says), select OK.
- On the Sign In window, type your email and password. Then, select Sign In.
- On the Health Workforce Connector home page, your initials appear in the top right corner of the page. Select your name to display the drop-down menu. Then, select Virtual Connections to display My Virtual Connections Dashboard.
This dashboard displays:
- Your latest alerts
- Sites you are connected to
- Clinicians you are connected to
- Opportunities you are connected to
To set alert preferences from the My Virtual Connections Dashboard:
- In the Latest Alerts panel, select Set Alert Preferences.
- On the Set Alert Preferences window, you can set preferences for your sites, opportunities, and contacts. You can also set email notification preferences.
- When you are done, select Save Preferences.